Why WordPress is Dominant
WordPress, launched in 2003, has become the most widely used full content management system in the world. It is an open source, community-based system and therefore entirely free.
Ever-improving template options, plug-ins, SEO capability and client portal functionality have been essential to its success, making it competitive with the best proprietary options. Also contributing to its widespread use–bloggers and social media managers are able to host and moderate blogs from a single dashboard using WordPress’s editing tools, permalink structure and integration of HTML.
How to Protect your WordPress Website Against Hackers
Your WordPress database is the brain of your website, storing ALL of its information. Unfortunately, this makes it a favorite target for hackers who can easily send malicious code using JavaScript injecting SQL targeting your wp_ based tables.
Many users either forget or aren’t aware that they must change the database prefix when installing WordPress. If they don’t, they’re leaving the door wide open for hackers to change their database prefix, giving them access to launch an attack.
To prevent this, take the following several steps to change the WordPress database prefix–
- If you already have a WordPress site, either view your config.php file or go to phpMyAdmin in cPanel to check your tables’ names.
- Make a // entry in config.php that displays the WordPress table prefix used in the installation
$table_prefix = ‘wp_’; //. Use only numbers, letters, and underscores!
To make your WordPress site even more secure, change the prefix to something that is difficult to guess. Pick something like a hard-to-crack password, one limited only to numbers, letters, and/or underscores.
Another option is Philipp Heinze’s plugin “wp prefix changer” that he created for BlogSecurity.net. However, I prefer the manual approach described above, which I’ve successfully applied to two blogs.
If your prefix is simply wp_, I highly recommend taking the next six steps that I recently tested with a WordPress 2.8 installation–
1. Make a Backup
Because these protective measures involve a change in your WordPress table structure, you will need to first make a backup. In cPanel, click on the “Backups” icon and click again on “Generate/Download a full Backup.” Then proceed with “Home Directory Backup”.
2. Edit Your wp-config.php File and Make Changes, as Follows-
- $table_prefix = ‘wp_’;
To something like–
- $table_prefix = ‘h21pow44_’;
3. Change all Your WordPress Table Names
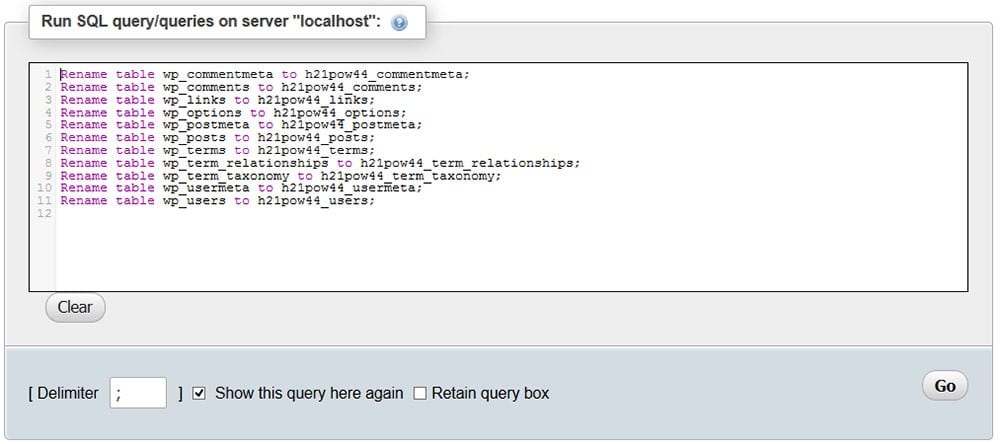
Go to phpMyAdmin and choose your WordPress database. Click on the SQL menu and enter the command to rename all your tables. Do this one table at a time.
Note: You might have many tables that start with the “wp_” prefix. If so, change them all.
Every time you paste one line into the SQL window, click on GO and locate the table name change on the left. Keep changing the table names until all your WordPress tables have the new prefix.
Rename table wp_commentmeta to h21pow44_commentmeta;
Rename table wp_comments to h21pow44_comments;
Rename table wp_links to h21pow44_links;
Rename table wp_options to h21pow44_options;
Rename table wp_postmeta to h21pow44_postmeta;
Rename table wp_posts to h21pow44_posts;
Rename table wp_terms to h21pow44_terms;
Rename table wp_term_relationships to h21pow44_term_relationships;
Rename table wp_term_taxonomy to h21pow44_term_taxonomy;
Rename table wp_usermeta to h21pow44_usermeta;
Rename table wp_users to h21pow44_users;
Serverview:
4. Edit wp_options
Then you need to edit the h21pow44 _options table (formerly wp_options) table
- Click on the table name link and then click on the Browse Menu item. You will see all the data stored in that table. Look under the option_name column header and–
- Change wp_user_roles to h21pow44_user_roles. You will be able to change it by clicking on the edit button for that record.
Note– wp_user_roles might not appear on the first page under options. But keep looking for it, otherwise you will not be able to login afterwards.
5. Edit wp_usermeta
And finally–
- Apply changes to h21pow44_usermeta formally (wp_usermeta). Don’t miss any records.
- In phpMyAdmin, highlight h21pow44_usermeta link and click the Browse Menu.
- Change every value under meta_key column header that starts with the old prefix wp_ to the new prefix h21pow44_ (The number or records might be different for your web site).
For example, I changed the following in my installation–
- wp_capabilities to h21pow44_capabilities
- wp_autosave_draft_ids to h21pow44_autosave_draft_ids
- wp_user_level to h21pow44_user_level
- wp_usersettings to h21pow44_usersettings
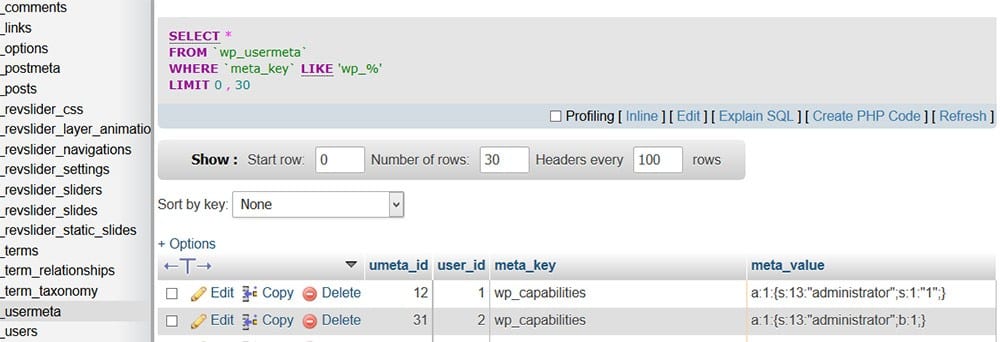
You can then run a query in phpMyAdmin to determine how many records you need to change–
- Simply click on the search link, add the following search condition (meta_key like ‘wp_ %’), and click the GO button (see image). This will get you the exact number of record you need to update.

After you hit the “GO” Button you see something like this:
6. Almost Done
You should now feel a lot more secure, giving you the peace of mind to focus on blogging. Oh, one more thing. Do another backup!
Tips
Pro Tip #1 – Create complicated passwords, allow two-factor authentication & move your login page
You don’t want your website to be hacked through your user accounts. To secure your WordPress website from hackers regarding user accounts, you can force users to create a strong password to prevent account theft.
You can also ask users to use a two-factor authentication system to reinforce your website login page security.
I would recommend banning any login attempt using a non-existent username, why would you let a hacker try any username until he found one!? Don’t let anyone try more than 10 password attempts. Also, auto-ban their IP too.
You can also move your login page. By moving the login page, all bad bots trying to log on your site will get a 404 error message and will leave instantly, leading the bots to think your website is not a good target.
–Julio Potier, Founder – SecuPress
Pro Tip #2 – Hosting, SSL, & custom admin login
Know how to choose the right hosting provider, and know that securing it is as vital as deploying an external monitoring system (i.e., CloudFlare) to protect your site against DDoS attacks.
You’ll also want to set up an SSL certificate and get your data and traffic encrypted, disable PHP error reporting, and update your file permissions to prevent unauthorized users from tampering with them.
For instance, never leave your login name as “admin.” Create a custom login instead, and you’d better make it complex.
–Balaji N., Editor-in-Chief – GBHackers
Guest Post Written by Hamed Pour of OWDT.com. For more on Hamed, click here.